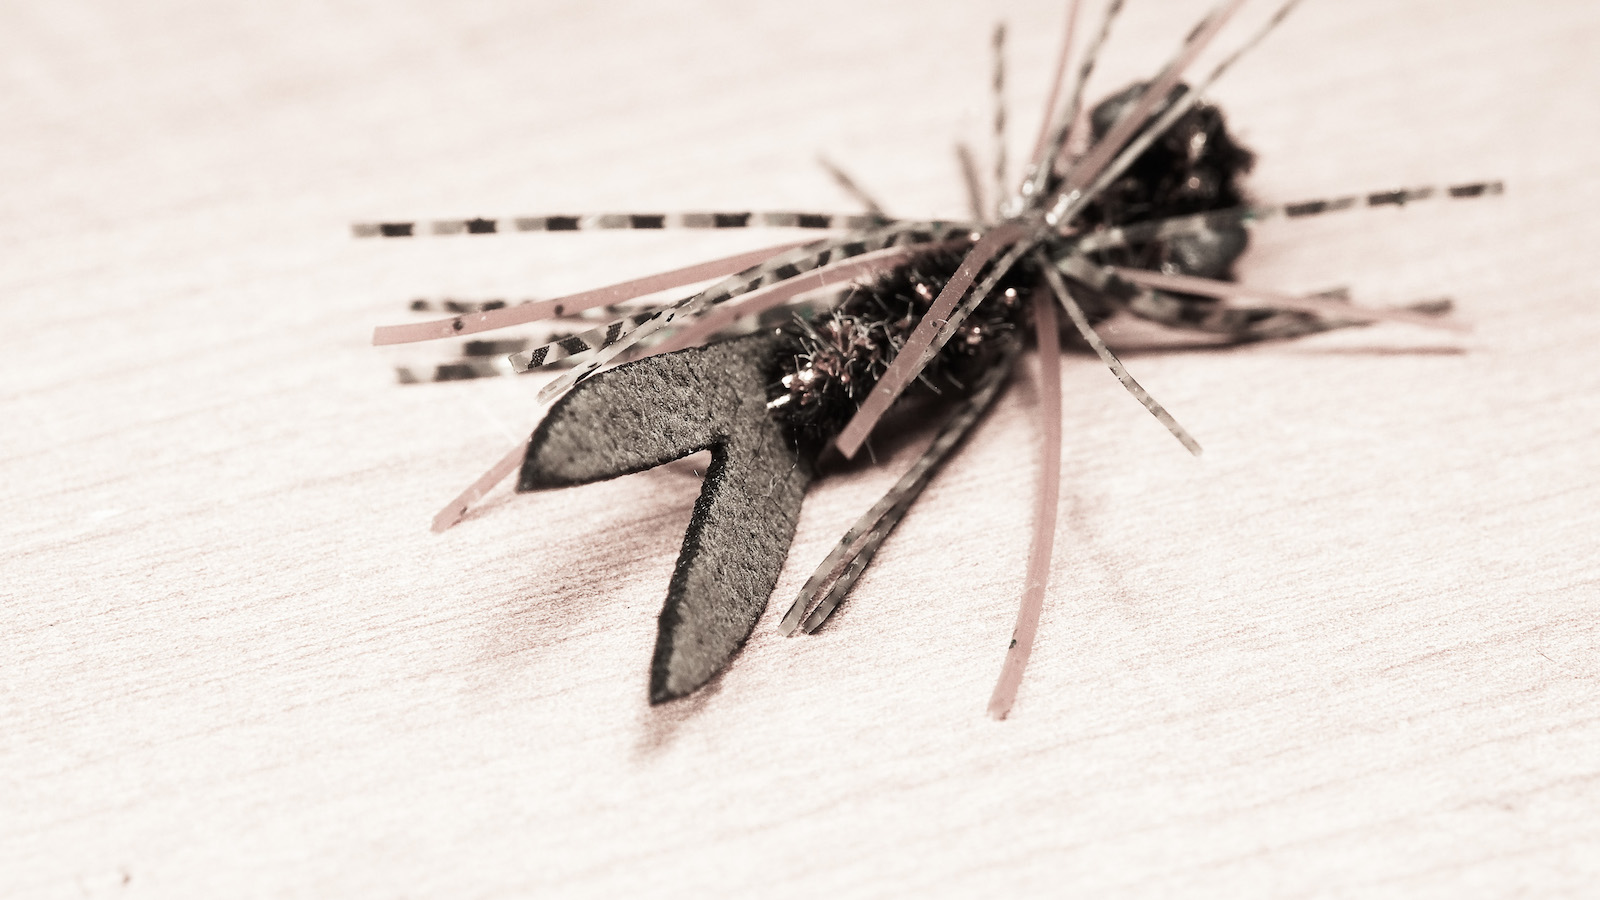
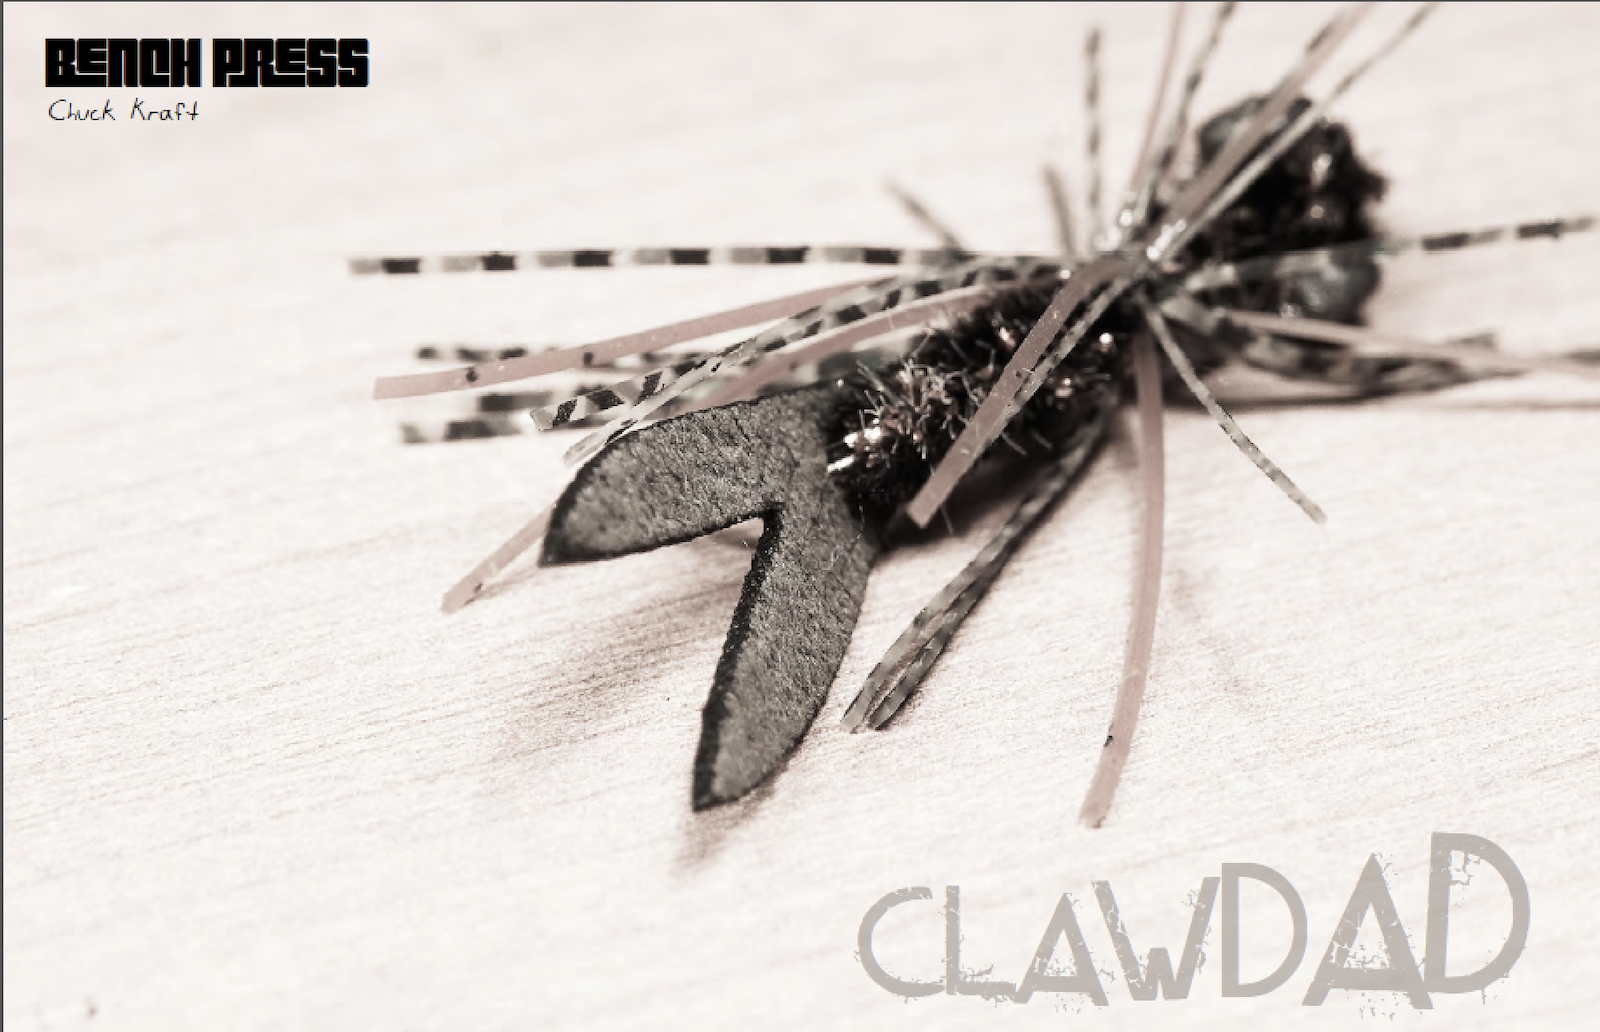
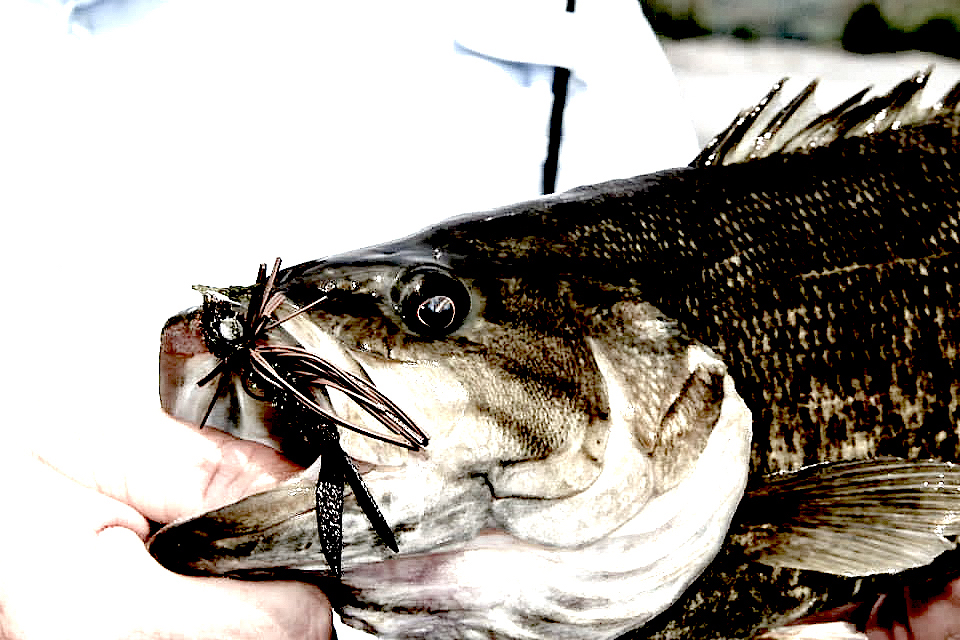
Chuck Kraft was one of the first fishing guides on the New, James and Shenandoah Rivers in Virginia, and guided their waters for more than 40 years. Chuck is well known for his simple fly patterns that use only three or four materials. As Chuck says, “If you want a fly that works, it needs to look like the bug and move like the bug.” Many of Chuck’s patterns are go-to flies for many anglers and guides in the Mid-Atlantic. I, myself, and all of Mossy Creek Fly Fishing’s guide staff, fish Chuck’s flies almost exclusively. Chuck’s Clawdad, developed in 1996, is an amazing crayfish pattern. He developed the fly to be a “Pig-N-Jig” for the fly rod angler. It’s simple, built like a tank and extremely effective. Chuck Kraft has had clients catch smallmouth bass up to six pounds with this fly, and trout up to 10 pounds. Colby Trow of Mossy Creek Fly Fishing says, “There is never a boat on our smallmouth floats that doesn’t have a fly rod rigged with a Clawdad.” I myself have yet to find a better crayfish pattern. Chuck Kraft retired from guiding in 2012, and resides in Chartottesville, Va. He ties flies for Eastern Trophies Fly Fishing and other local fly shops. Chuck has been working with Eastern Trophies Fly Fishing in Alexandria, Va., since 2010 as Tail Designer and Fly Developer.


MATERIALS LIST
Hook: 5263 in #’6-#2, Mustad R74 in #6-#2, Daiichi 2461 in #1/0-#2/0
Thread: Color to match
Eyes: Dumbbell Eyes – Small/#6, Medium/#4, Large #2, XL/#1/0-#2/0
Legs: Round Rubber Legs – Medium for #6-#2, Large for #1/0-#2/0
Body: Chenille – Medium for #6-#2, Large for #2-#2/0
Tail: Eastern Trophies Fly Fishing Clawdad Tails in #6-#1/0
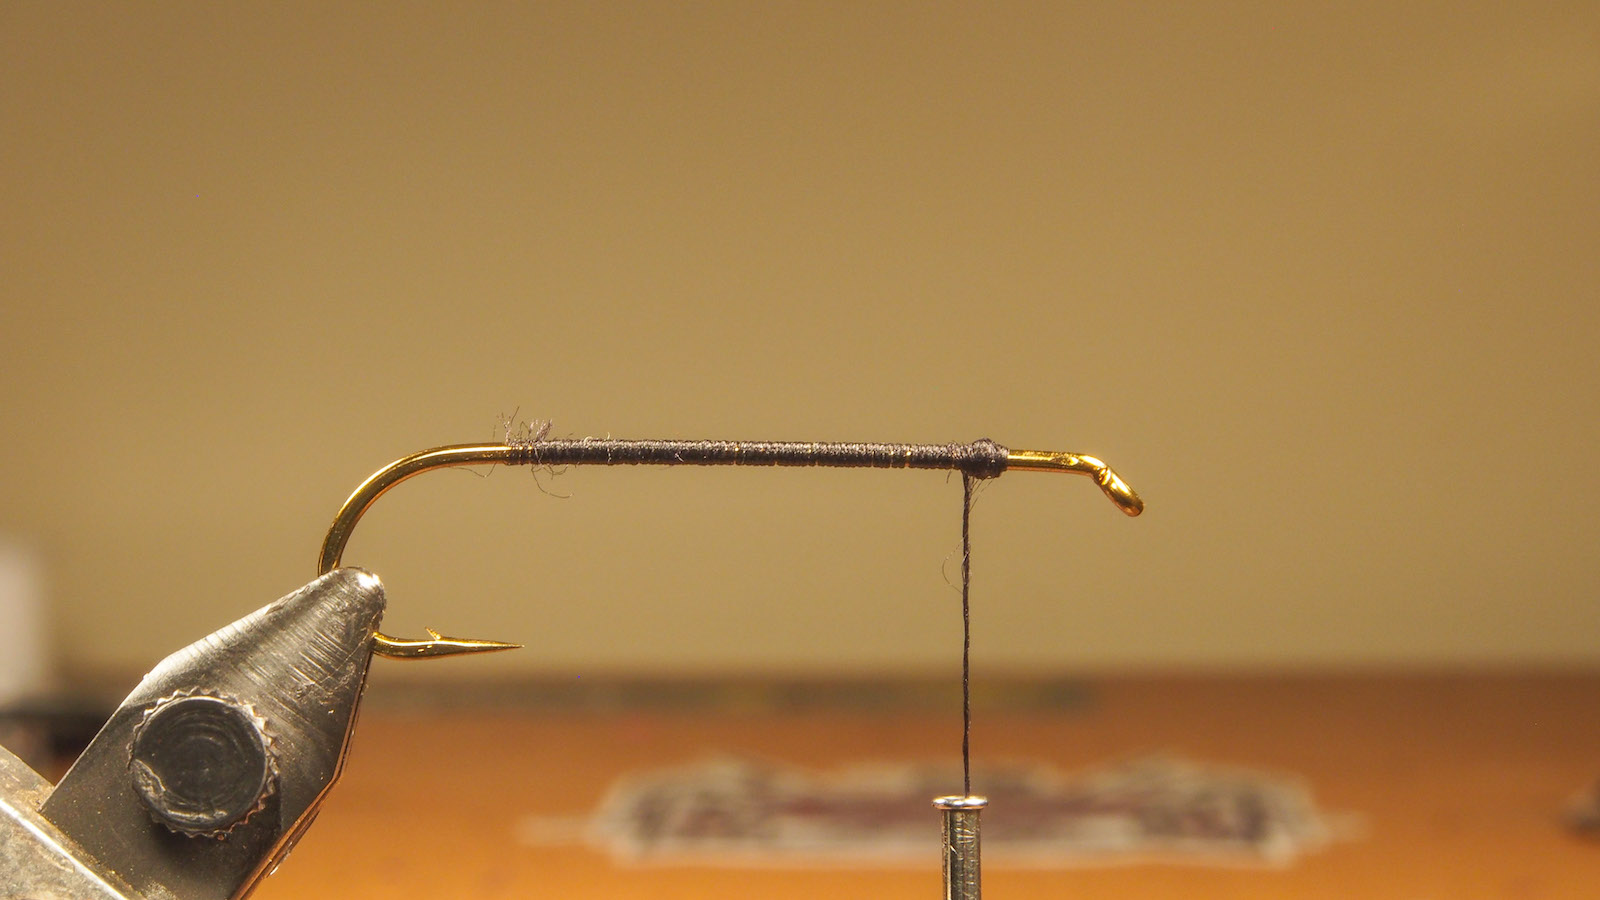
1. Start your thread behind the eye of the hook and wrap back to the bend of the hook. Wrap back up to a point one-fifth the length of the hook behind the eye. At this point, make a bump of thread. This will serve as a front foundation point for the dumbbell eyes.
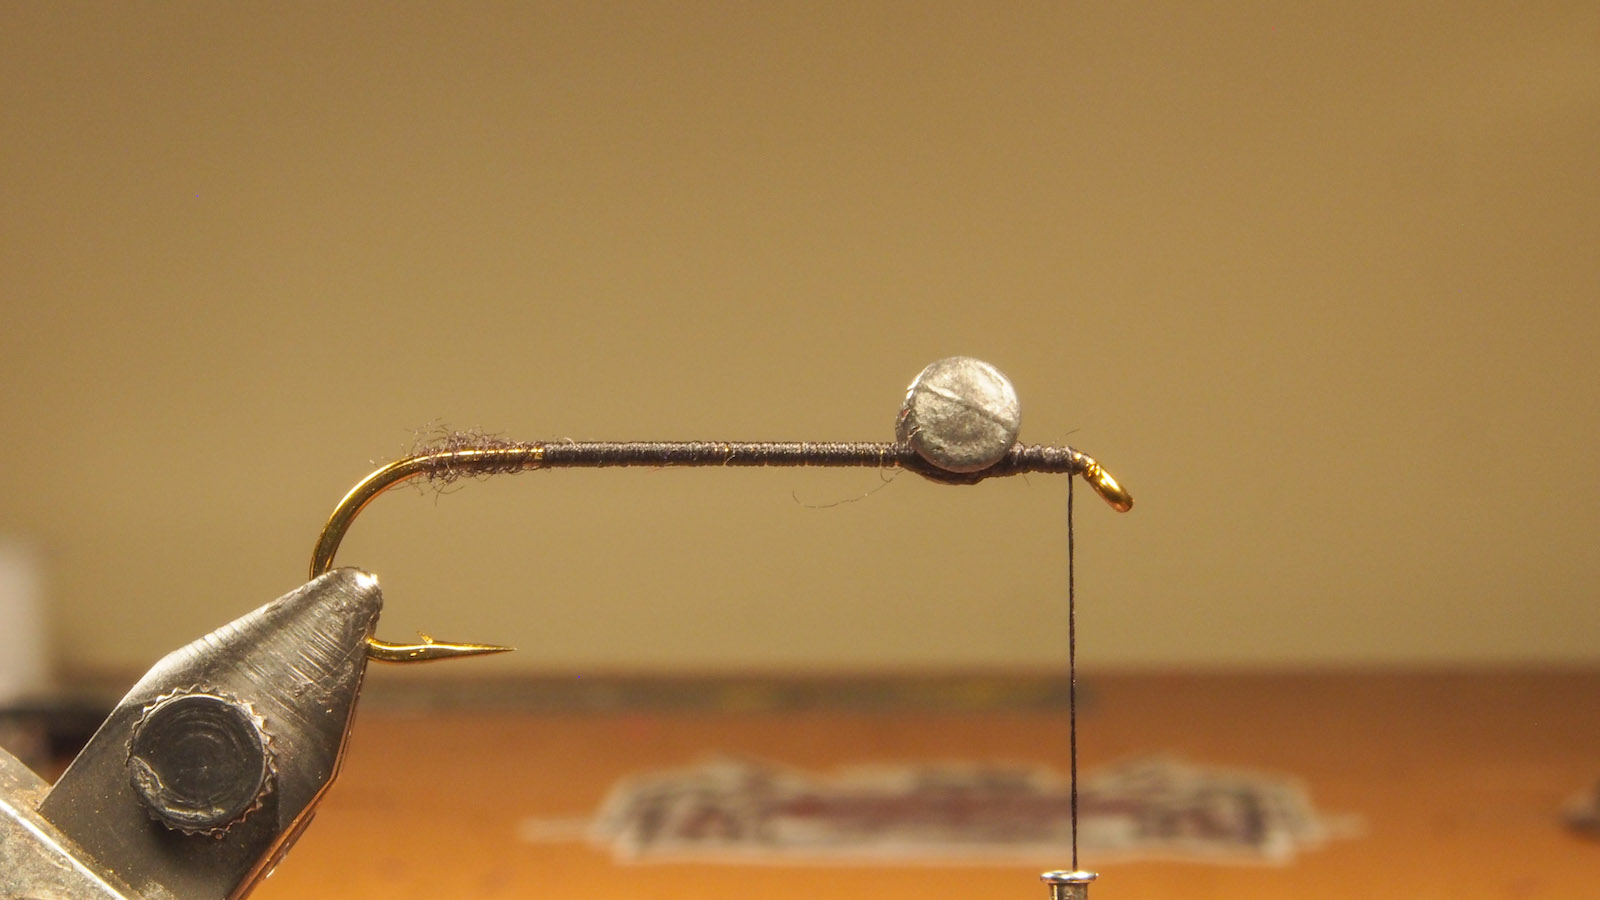
2. Wrap in your dumbbell eyes on top of the hook shank right behind the bump of thread you created. Use 8-10 crisscross wraps in each direction followed by 8-10 securing wraps around the crisscross wraps between the dumbbell eyes and the shank of the hook. Repeat this step again, crisscross wraps followed by securing wraps. You can use a drop of super glue or zap-a-gap where you place the dumbbell eyes on the hook. Painting your dumbbell eyes is optional but certainly makes a better fly. Use lacquer nail polish and paint the eyes a color to match your body color and/or tail color.
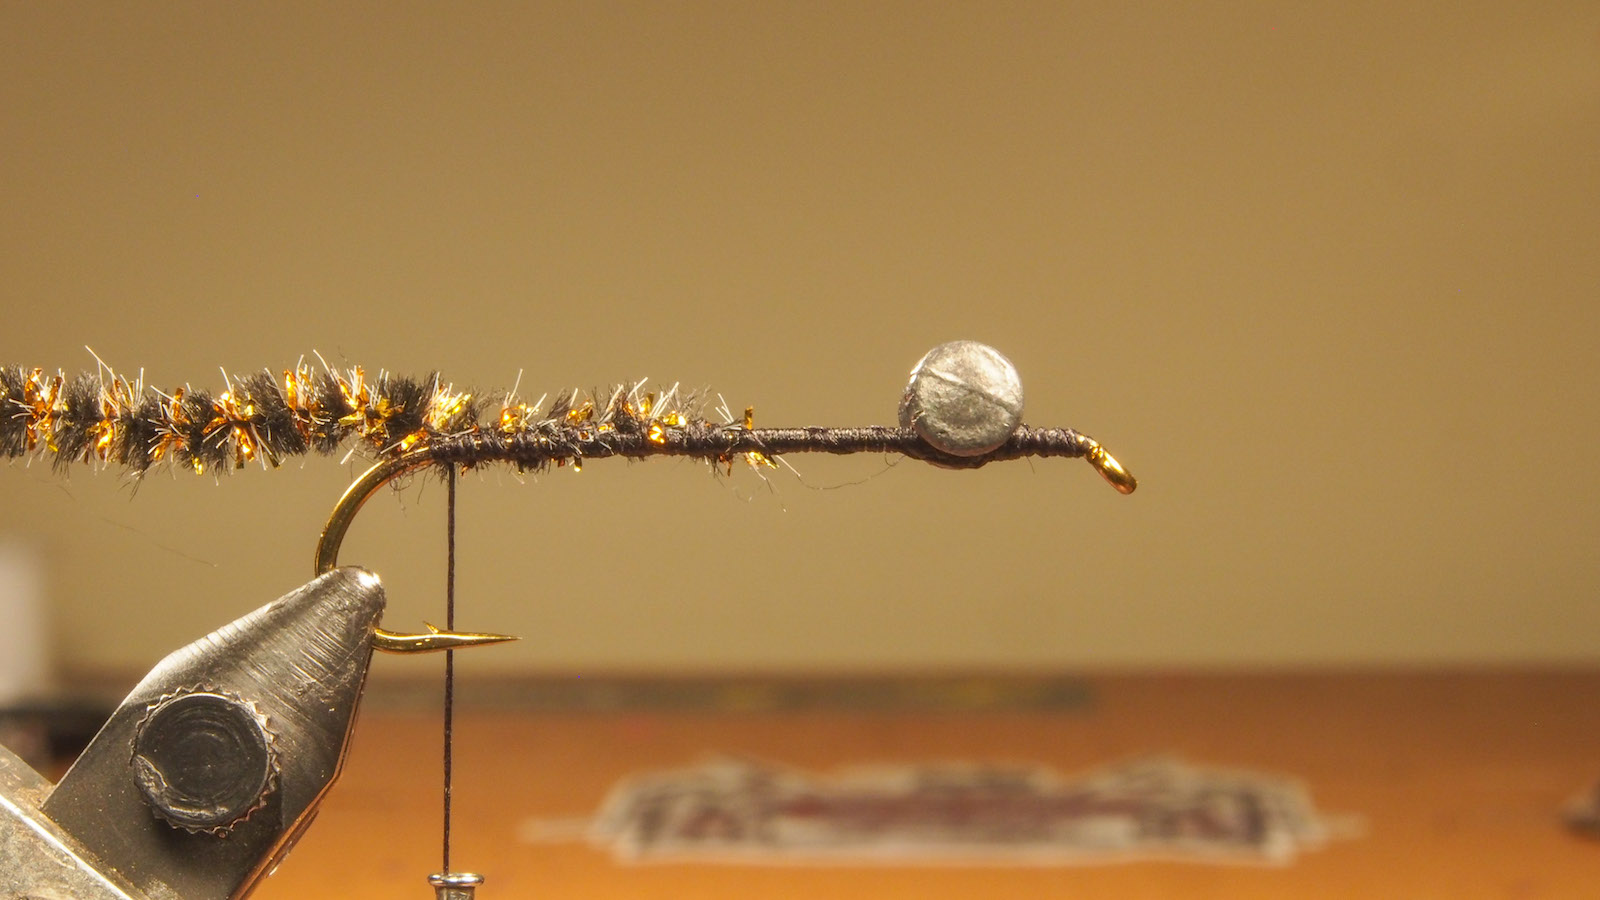
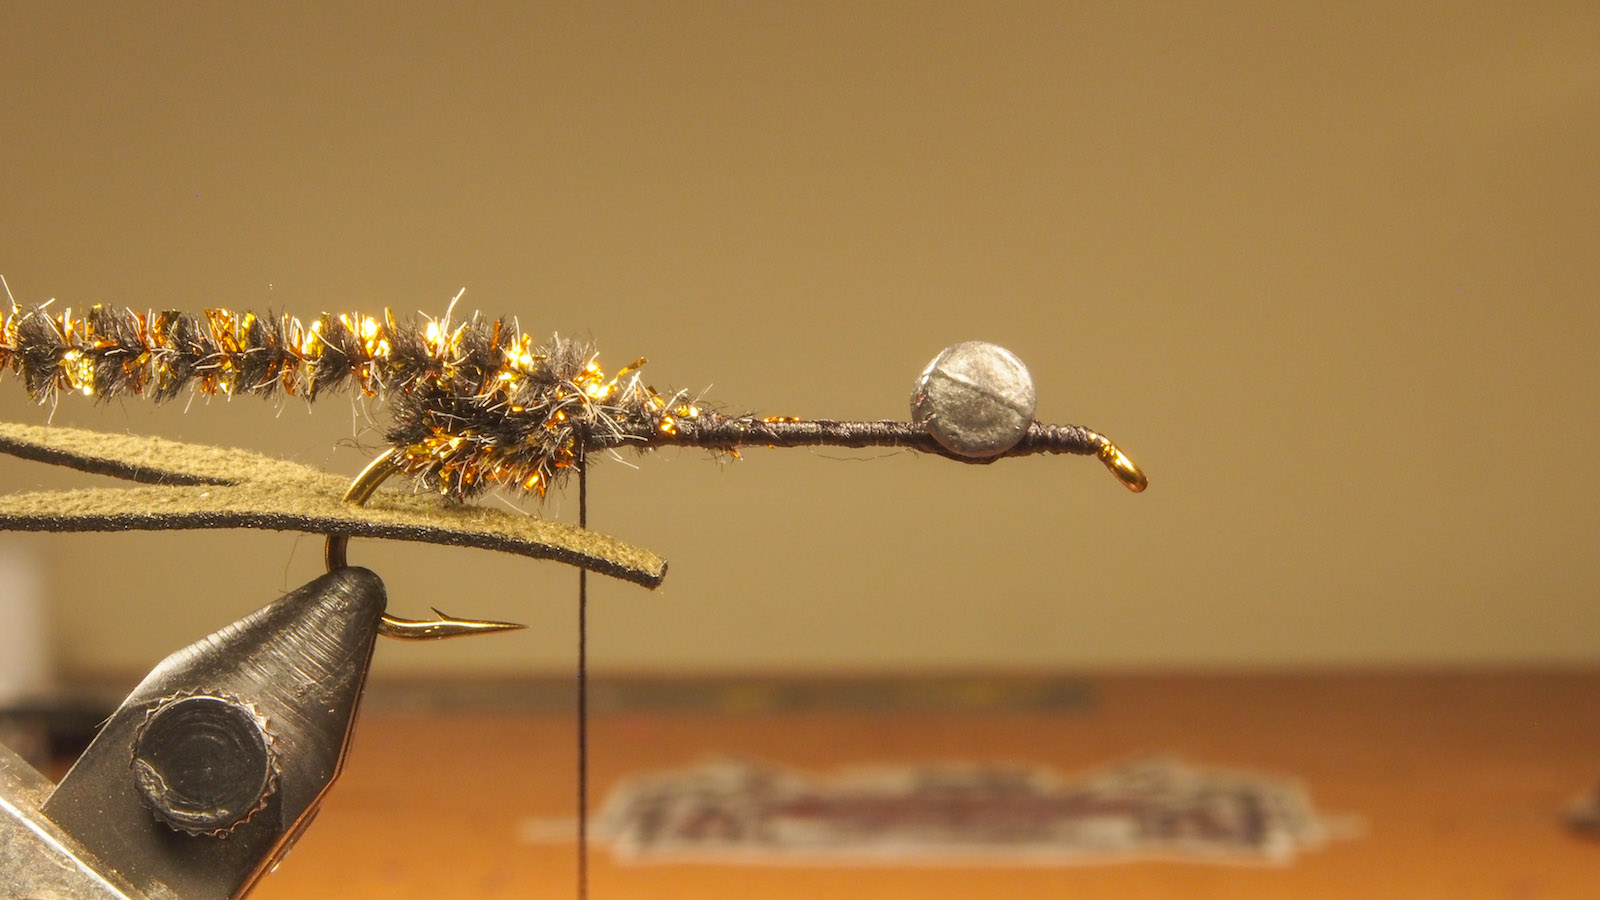
3. Move your thread to the middle of the hook. Pull a few fibers from one end of your chenille to expose the base and tie your chenille in at the middle of the hook. Wrap the chenille all the way back to the back third bend of the hook, holding the chenille straight up as you wrap so it lays on top of the hook shank. Wrap your thread back up the shank to where it drops straight with the hook point.
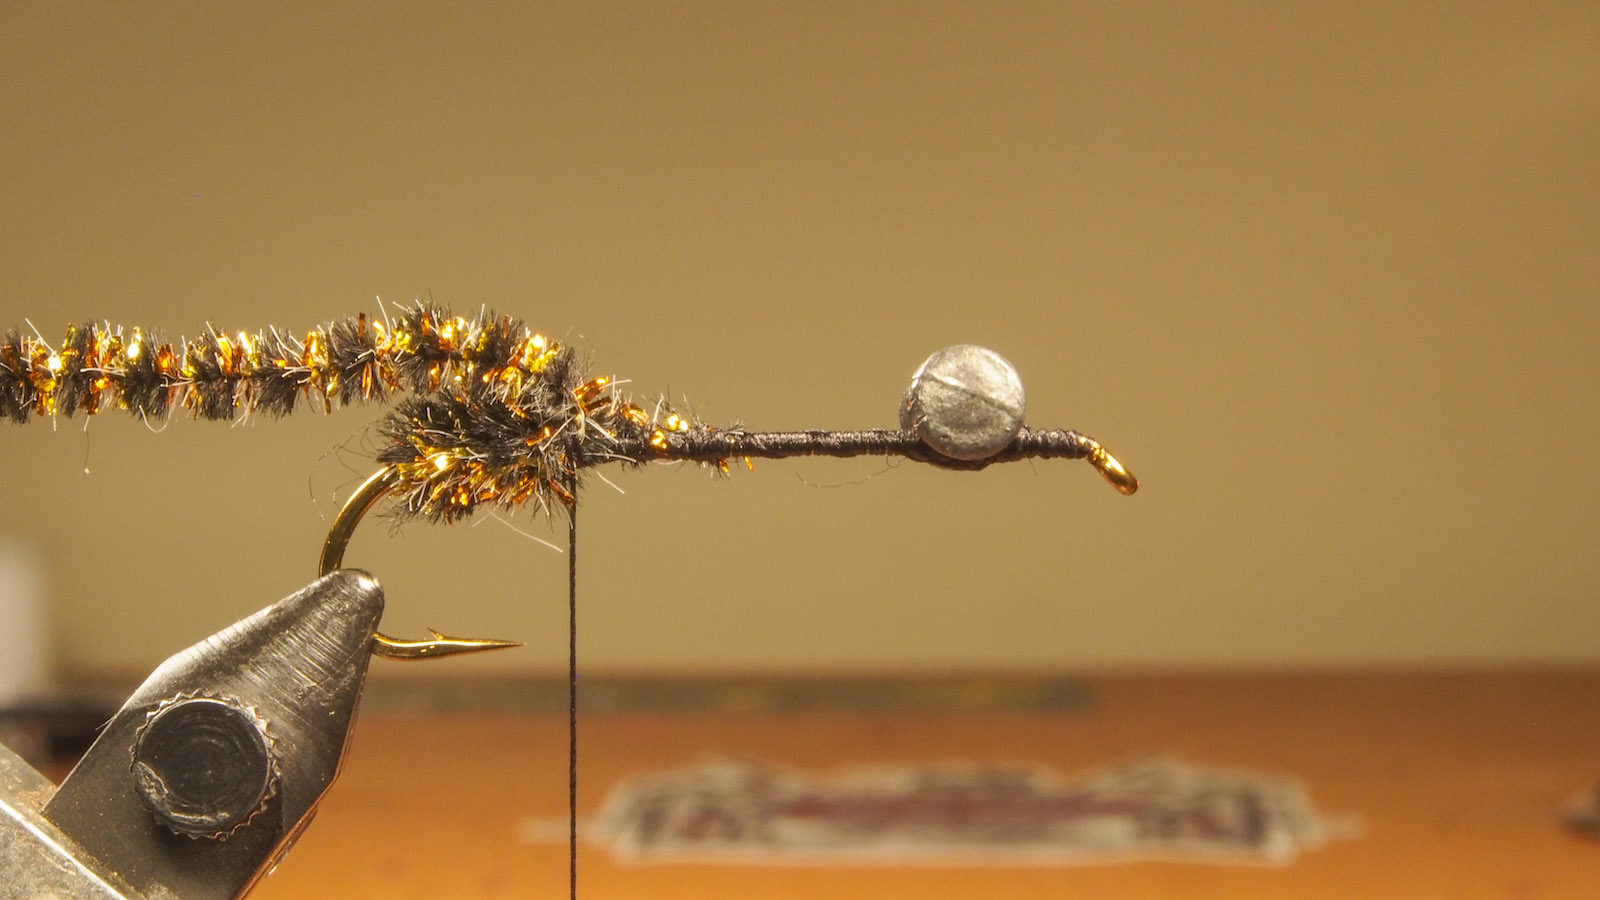
4. Wrap the chenille around the hook with paltering wraps from the third bend to the point of the hook, carefully making sure that each wrap sits right next to the other. Secure the chenille in right at the hook point with securing wraps. Half hitch at this point.
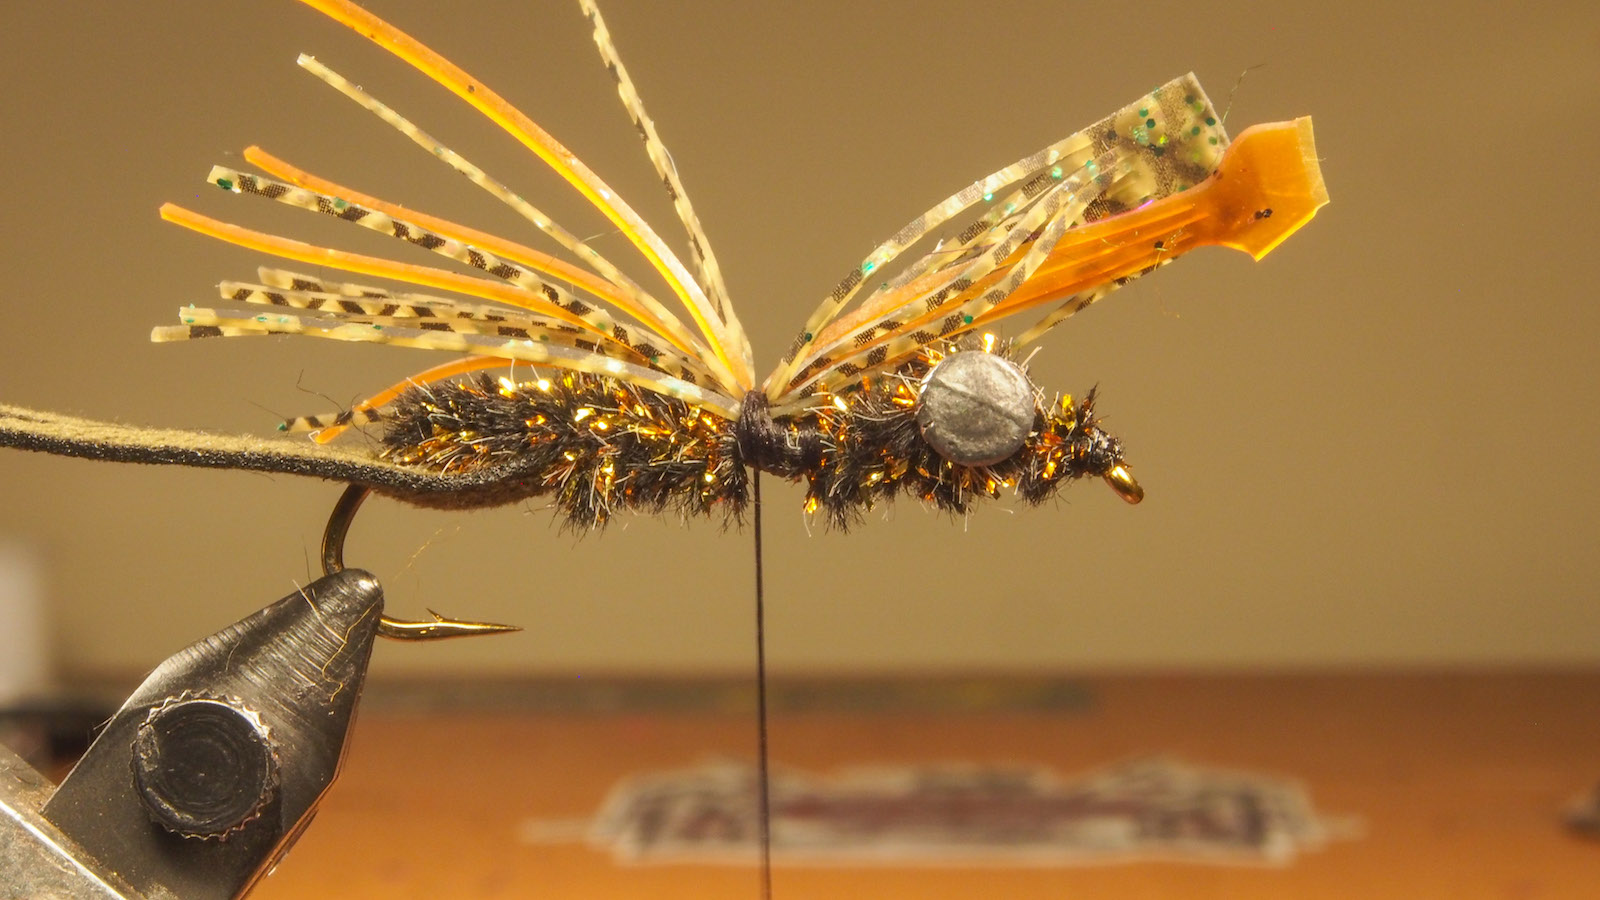
5. Remove the hook from the vise and slide the Clawdad tail onto the hook. There is a precut hole in each tail. Secure your hook in your vise again.
6. Pull the small tab of the tail toward the front of the hook so the claws of the tail point to the back. Hackle pliers work well if you have large fingers. Wrap in the tab that is being pulled with securing wraps, making sure the tail lines up with the shank of the hook. Wrap completely over the tab and until your thread is just about halfway on the shank of the hook. Wrap the chenille to the middle of the hook and secure with 8-10 wraps. Holding the chenille straight up, continue wrapping it until the chenille is right behind the eye of the hook. This creates a flat area of just thread where you will later place the rubber legs.
7. Leave your thread behind the dumbbell eyes. Crisscross the chenille around the dumbbell eyes. Continue wrapping the chenille to the front of the hook right behind the hook eye, and then back behind the dumbbell eyes. Holding the chenille straight up, do 6-10 securing wraps locking the chenille in place right behind the dumbbell eyes, then trim.
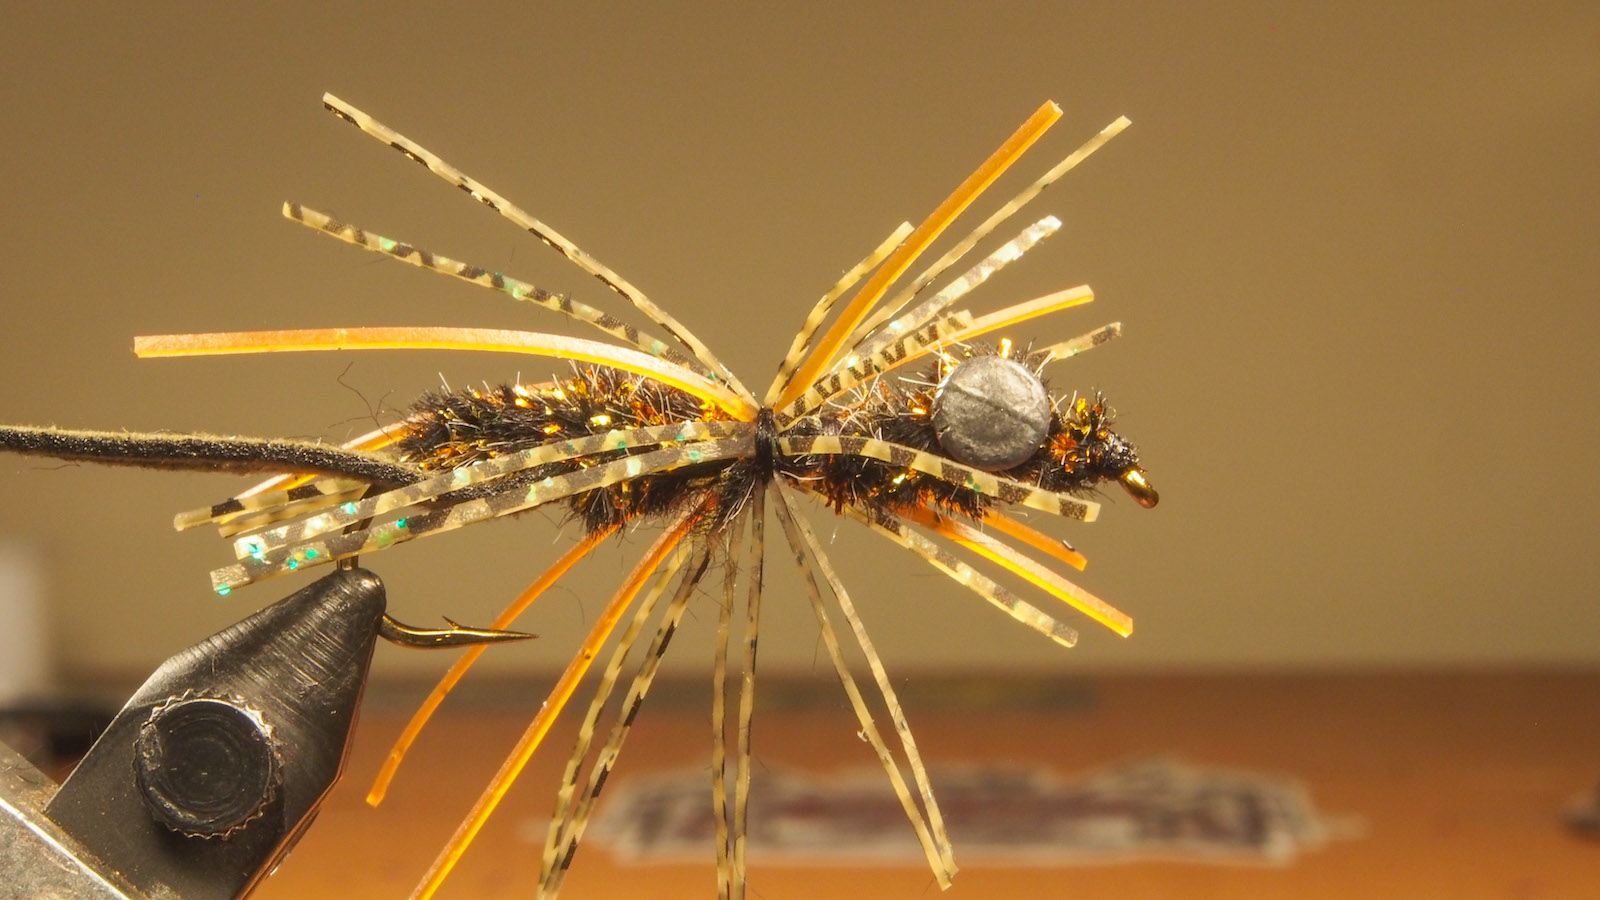
8. Cut a length of round rubber legs the length of the Clawdad tail you are using. Keep them together. Count off 6 legs and separate that “pad” of legs, keeping the 6 legs together. Count off another 7 legs and separate that “pad” of 7 legs. Wrap the pad of 7 legs on top of the shank of the hook behind the dumbbell eyes where the exposed thread base is. The front of the legs should just come past the eye of the hook and the back of the legs should go past the bend of the hook. Turn the hook over and wrap in the “pad” of 6 legs in the same fashion as the first set, just on the opposite side. Do 10-15 wraps of thread once both sets are in place. Whip finish your fly there. Coat the thread wraps with head cement.
9. Separate the legs from one another. If tied correctly, legs should cover the entire circumference of the hook. The angle of the front legs should look like a lion’s mane and extend at an angle right in the middle of the dumbbell eyes and the eye of the hook. The back legs should extend past the bend of the hook even with the “V” in the Clawdad tail. Remove the fly from the vise. Pull the Clawdad tail away from the shank of the hook where the bend of the hook is. Place a small bead of gel super glue between the chenille body and the tail. Push the tail back into place. This step keeps the tail in place, which enables the fly to move like a real Crayfish moves.